You all know the need, and what to do. With the current guidelines, we all should be wearing masks in public. This mask pattern is what I believe is the most protective design, and uses fabrics that are among the most protective, according to Filti Mask Test Results.
How is this pattern different? This face mask is designed to cup the face with a better seal than any other pattern I've seen to date. We've added some special details that we believe will make the design protect better. It is shaped like the N95, and it's been tested for fit.
With all the controversy about cotton masks, you might be thinking, how can we make a mask that is safer? Well, this pattern is the answer to that. We've found a source for good filtration fabric, using patent pending Nanofiber technology, which, according to the manufacturer, is highly efficient on sub-micron particles. And the best part? It's hand washable! * Please see note in comments below regarding the drop in efficiency. As of April 1, we had information from Filti that the fabric was hand washable with soap and water (for a few times, at least). As with everything regarding this virus, new information is coming to light daily, and I am currently checking into any new developments or testing regarding this. Filti fabric is washable, but it is not guaranteed that washing will eliminate the COVID-19 virus particles from the mask. Because of the threat of the virus remaining after washing, Filti has recommended that you use the CDC decontamination methods listed HERE . I have verified that Filti recommends heating to decontaminate as follows:
You may heat the material to 150F for 30 minutes and the product will still have its original efficiency capabilities!
As with everything regarding this virus, we are getting new information every day, and the information provided here is updated as soon as I become aware. Please do your own research and make the best choice for yourself.
Download our pattern below to find out where to get this special fabric!
You may heat the material to 150F for 30 minutes and the product will still have its original efficiency capabilities!
As with everything regarding this virus, we are getting new information every day, and the information provided here is updated as soon as I become aware. Please do your own research and make the best choice for yourself.
Some masks similar to our design have been tested, but we have not conducted any specific tests on our masks and we make no claims regarding their protective ability.
Download our pattern below to find out where to get this special fabric!
 Download FREE Pattern NOW
 To date, our tailor shop has made dozens of these masks. If you would like to sew along with us, stay tuned, and I'll go over all the steps below.
Just to reinforce all the warnings in the pattern instructions:
- Don't use pins
- Don't use hot glue on the filter fabric
- Use a #9 needle.
At this time, you will also cut out your lining. In my experience, the filti fabric can be irritating to the skin, so I strongly recommend a lining. I used a plain broadcloth, which is a polyester-cotton blend.

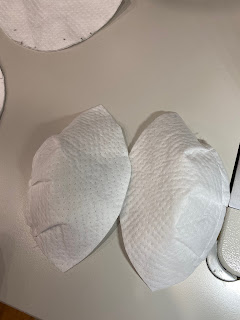
Next, we are going to pinch the pleats together, with the folds going downward, and baste them down along the seamline to hold them in place.
 Do the same thing to the other half of the mask, making sure you have marked the TOP of the mask, and making sure you have a right and a left.
Do this for all your layers, and the lining, too.
Now, sew together the halves, right sides together, down the center (the unpleated edge). Do this for every layer, and the lining, too. Notch that curve with your scissors. Then turn the halves out,and finger press the seam.
Now you will place the formed mask and lining right sides together, and sew around the perimeter, leaving a gap at the top, to turn it.
Now, let's turn that mask right side out through the gap. That's really hard to show in a picture.
Now we just smooth it out, and sew up that gap at the top.
Now on to the nose piece. You will have taken a 2" piece of wire, and hot glued it into a small swatch of felt, enclosing it on all sides.
Take a larger rectangle of the filter fabric, and center it over the wire-felt piece. Line the wire casing up with the top edge of the mask; the filter fabric topper can hang over the edge.
Sew through the filter fabric topping to encase the nose wire on all sides, while attaching it evenly to the top of the mask.
This is how it will look from the inside when you are done.
As you can see, we've left some excess all around that topping so that you don't have to worry too much about lining it up while sewing, and we will trim that excess off now.

Be careful as you trim the excess, don't nick your mask.
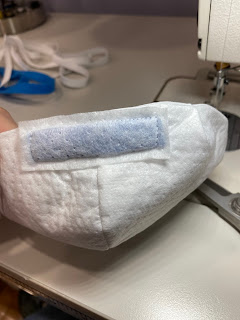
Next we will do the inside edge strip. The idea behind this is that it helps the mask seal to your face. It acts sort of like weather stripping. Remember - we aren't using pins. So hold it along the edge under your work, and topstitch along the edge, being careful to catch the felt strip underneath. This isn't a race ;)
Here's your finished edge strip from the inside.
Lastly, you attach the elastic at the areas that you marked from your pattern. You did mark those, right? I knew you would.
I like the two-step approach to securing the elastic.
First, set the elastic end toward the edge of the mask. Secure it down by running back and forth over it a few times.
Now, pass the elastic over the stitches, folding it over to the right. Stitch this down, encasing the raw edge of the elastic. Again, I run over it a few times to secure it well.
Attach the other end of the elastic to the opposite side, and repeat with the other elastic, on the lower markings.
Comment below with any comments or questions... download, share, and sew up as many as you can!
Blessings and safety to you all, as you help in the fight against COVID-19 by making these masks!
x
Amy


This is super nice of you to share the pattern, but I'd LOVE to PURCHASE one/some of these should you ever offer them for sale, as I'm not a person who sews, etc. If ever available feel free to contact me at trajala@fsu.edu or look me up on FB (Trevor Rajala). Thanks!
ReplyDeleteWe aren't selling masks at this time, but feel free to share our blog post on your social media, and I'm sure you will connect with someone who will sew them for you!
DeleteNOT WASHABLE!! Below is an email from Filti:
ReplyDeleteBri Ely
4/24/2020, 1:30 PM
Hello!
Thanks for reaching out regarding our Filti Material. With the results of our recent testing, we have determined that the material lost efficiency after washing. The virus can get attached to certain particles, so there’s no proven washing method that would eradicate the virus from the material. We recommend using the material in a disposable fashion or referring to the CDC guidelines for a method of material sanitization. We are not giving recommendations as to how long a “single-use” is considered because that answer relies on many factors including the environment (inside/outside), proximity to others, the risk level of people they will be exposed to, and also if the use is at high risk themselves (children, pregnant women, elderly, immunodeficiencies, etc.)
Please refer to the CDC guidelines in regards to sanitizing filter material: https://www.cdc.gov/coronavirus/2019-ncov/hcp/ppe-strategy/decontamination-reuse-respirators.html
NOT WASHABLE!! Below is an email from Filti:
ReplyDeleteBri Ely
4/24/2020, 1:30 PM
Hello!
Thanks for reaching out regarding our Filti Material. With the results of our recent testing, we have determined that the material lost efficiency after washing. The virus can get attached to certain particles, so there’s no proven washing method that would eradicate the virus from the material. We recommend using the material in a disposable fashion or referring to the CDC guidelines for a method of material sanitization. We are not giving recommendations as to how long a “single-use” is considered because that answer relies on many factors including the environment (inside/outside), proximity to others, the risk level of people they will be exposed to, and also if the use is at high risk themselves (children, pregnant women, elderly, immunodeficiencies, etc.)
Please refer to the CDC guidelines in regards to sanitizing filter material: https://www.cdc.gov/coronavirus/2019-ncov/hcp/ppe-strategy/decontamination-reuse-respirators.html
Thank you for this update. At the time I posted this pattern and instruction, we were being told that the material was washable. Filti filters (for furnaces) are washable up to 2 or 3 times. It is important to note that the efficiency will drop with washing, and I appreciate the newer information.
DeleteI think having multiple masks in Tupperware- (cracked open) is the best method. You can have one for each day of the week- when day 1 rolls around- the virus should be mostly dead. But Im not a virologist and they learn more each day on its survival on materials.
ReplyDeleteThat sounds like a good plan too!
ReplyDeleteLiquid resistance – if a mask is KN95 certified, it will have a waterproof layer that will prevent the passage of fluid. You can test this by pouring some water into the mask. KN95
ReplyDelete